Managing Canvas LMS at scale is time-consuming and error-prone. Administrators clicking through web interfaces, developers writing boilerplate HTTP requests, instructors manually grading hundreds of submissions - these repetitive tasks drain productivity and introduce human error.
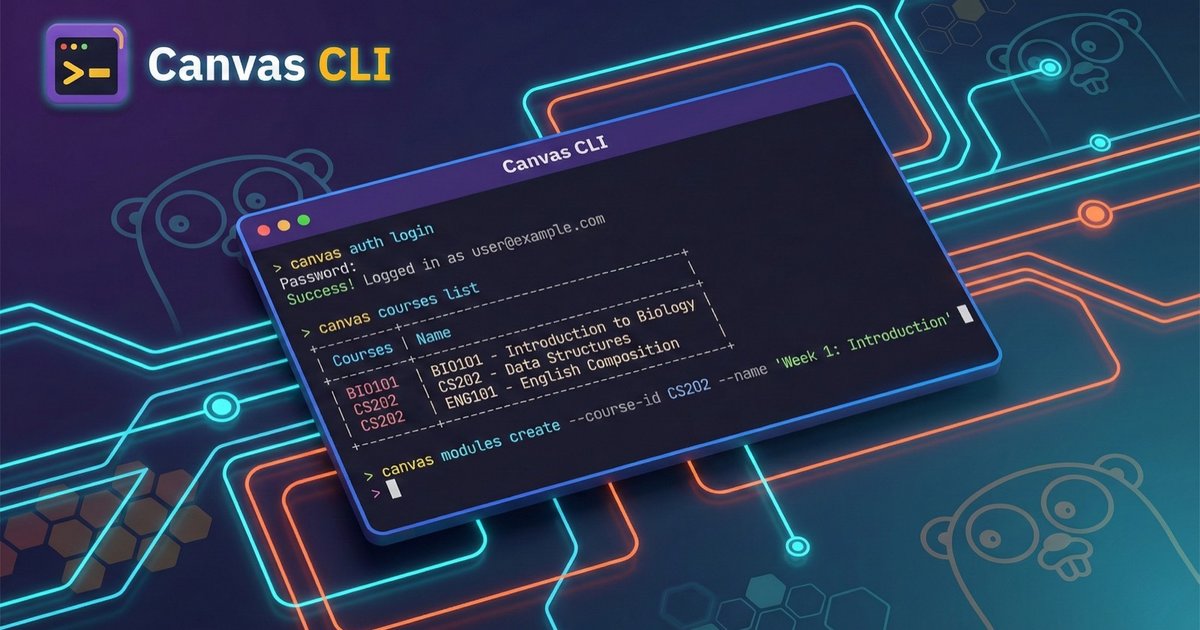
With AI agents now running tasks from the terminal, I built Canvas CLI - a tool to help me and my AI agents on my day-to-day work with Canvas LMS. Built with Claude Code using the Ralph Wiggum loop technique, it’s designed for both human operators and AI agents alike.
In this comprehensive guide, I’ll walk you through everything from installation to advanced automation workflows that can save you hours of manual work.
Why Use Canvas CLI for LMS Automation?
The Automation Challenge
Canvas LMS is feature-rich, but automating it traditionally requires either:
- Custom scripts - Writing HTTP requests, handling pagination, managing tokens
- Third-party tools - Often limited in scope or requiring paid licenses
- Manual work - The web interface for everything (not scalable)
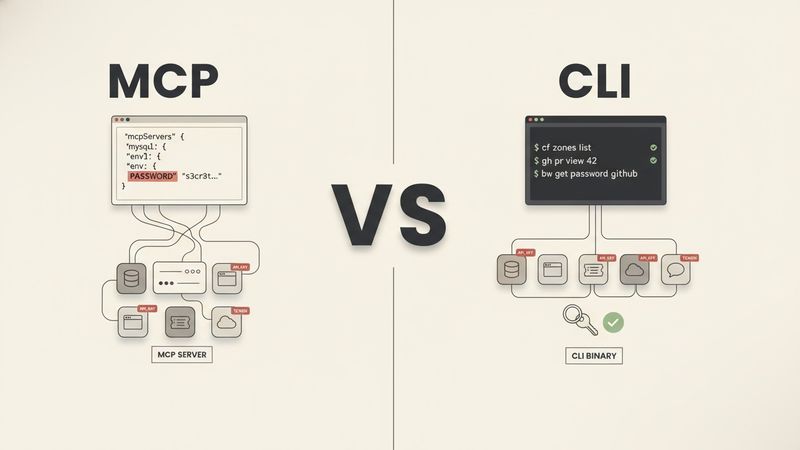
AI Agent Ready: Secure Automation Without Token Exposure
One of the most powerful aspects of Canvas CLI is its compatibility with AI agents. AI assistants like Claude can execute Canvas operations simply by knowing how to use the CLI commands - no need to expose API tokens directly to the LLM.
The agent inherits permissions from the authenticated token stored securely in your system keyring, meaning:
- No token exposure - API credentials never pass through the AI model’s context
- Inherited permissions - The agent operates within your existing access scope
- Audit trail - All operations are executed through the CLI with standard logging
- Safe automation - AI can help automate complex workflows without security risks
- Scoped access - Token permissions limit what the AI can do, even if prompted otherwise
This is fundamentally different from giving an AI agent raw API tokens, where credentials could potentially be logged, leaked, or misused. With Canvas CLI, the AI only knows the commands - authentication is handled by your secure system keyring.
Key Features
- Cross-platform single binary (Linux, macOS, Windows, ARM64)
- Secure OAuth 2.0 + PKCE with system keyring storage
- Bulk operations from CSV (grading, enrollments)
- Interactive shell with tab completion
- Shell completions (bash, zsh, fish, PowerShell)
- Multi-instance management for dev/staging/production
- Webhook listener with JWT verification
- Built-in diagnostics (
canvas doctor) - Adaptive rate limiting & response caching
- Flexible output as table, JSON, YAML, or CSV
- Admin masquerading support
Development Practices
- 90% test coverage
- CI matrix: 3 OS × 2 Go versions
- Security scanning (govulncheck, gosec)
- 11 linters via golangci-lint
- Pre-commit hooks
- Automated releases and documentation
- Conventional commits
- Claude Code GitHub Action for PR assistance
Open source. Written in Go.
Prerequisites
Before installing Canvas CLI, ensure you have:
System Requirements
- Operating System: Linux, macOS, or Windows (amd64 or arm64)
- System Keyring: Available for secure token storage
- macOS: Keychain (built-in)
- Windows: Credential Manager (built-in)
- Linux: Secret Service (gnome-keyring or kwallet)
Required Tools
-
jq - JSON processor for parsing CLI output in scripts
# macOS
brew install jq

# Ubuntu/Debian
sudo apt install jq

# Windows (chocolatey)
choco install jq
Canvas LMS Access
- Canvas instance URL (e.g.,
https://your-school.instructure.com) - For OAuth 2.0: Admin access to create Developer Keys
- For API tokens: Settings → Approved Integrations → New Access Token
Installing Canvas CLI
Homebrew (macOS and Linux)
The easiest installation method uses Homebrew:
# Add the tap
brew tap jjuanrivvera/canvas-cli

# Install
brew install canvas-cli

# Verify installation
canvas --version
Go Install
If you have Go 1.21+ installed:
go install github.com/jjuanrivvera/canvas-cli/cmd/canvas@latestDirect Download
Download pre-built binaries from GitHub Releases:
- Linux (amd64, arm64)
- macOS (amd64, arm64)
- Windows (amd64, arm64)
Canvas CLI Authentication Setup
Canvas CLI supports two authentication methods: OAuth 2.0 (recommended) and API tokens.
OAuth 2.0 with PKCE (Recommended)
OAuth 2.0 is more secure because:
- No long-lived tokens stored in plain text
- Tokens can be revoked without regenerating API keys
- Scoped permissions per application
- PKCE prevents authorization code interception
Step 1: Register a Developer Key in Canvas
- Go to your Canvas instance → Admin → Developer Keys
- Click + Developer Key → API Key
- Configure:
- Key Name: Canvas CLI
- Redirect URIs:
http://localhost:8080/callback - Enforce Scopes: Optional (leave unchecked for full access)
- Save and note the Client ID and Client Secret
Step 2: Login with Canvas CLI
# Interactive login (opens browser)
canvas auth login https://your-canvas.instructure.com \
  --client-id YOUR_CLIENT_ID \
  --client-secret YOUR_CLIENT_SECRET

# For headless systems (manual code entry)
canvas auth login https://your-canvas.instructure.com \
  --client-id YOUR_CLIENT_ID \
  --client-secret YOUR_CLIENT_SECRET \
  --mode oob
The CLI opens your browser for Canvas authorization, then securely stores tokens in your system keyring (macOS Keychain, Windows Credential Manager, or Linux Secret Service).
Step 3: Verify Authentication
# Check auth status
canvas auth status

# Test with a simple command
canvas users me
API Token Authentication
For simpler setups or automation systems without browser access:
# Set token for an instance
canvas auth token set production \
  --url https://your-canvas.instructure.com \
  --token YOUR_API_TOKEN
CI/CD Authentication
For GitHub Actions, GitLab CI, or other pipelines:
# Set token via environment variable
export CANVAS_TOKEN="your-api-token"
export CANVAS_URL="https://your-canvas.instructure.com"

# Or use the token set command in your CI script
canvas auth token set ci \
  --url "$CANVAS_URL" \
  --token "$CANVAS_TOKEN"
Essential Canvas CLI Commands
Quick Reference Table
| Command | Description | Example |
|---|---|---|
canvas courses list | List your courses | canvas courses list -o json |
canvas courses get ID | Get course details | canvas courses get 12345 |
canvas users me | Get your profile | canvas users me |
canvas users list | List users in a course | canvas users list --course-id 123 |
canvas assignments list | List assignments | canvas assignments list --course-id 123 |
canvas submissions list | List submissions | canvas submissions list --course-id 123 --assignment-id 456 |
canvas submissions grade | Grade a submission | canvas submissions grade --course-id 123 --assignment-id 456 --user-id 789 --score 95 |
canvas enrollments list | List enrollments | canvas enrollments list --course-id 123 |
canvas enrollments create | Enroll a user | canvas enrollments create --course-id 123 --user-id 456 |
canvas auth status | Check auth status | canvas auth status |
canvas doctor | Run diagnostics | canvas doctor |
Exploring Courses
# List your courses
canvas courses list

# Get detailed course info
canvas courses get 12345

# List with custom output
canvas courses list -o json --limit 50

# Search courses
canvas courses list --search "Introduction to"
Working with Users
# Get your own profile
canvas users me

# List users in a course
canvas users list --course-id 12345

# Search for a user
canvas users list --search "john.doe@university.edu"
Managing Assignments
# List assignments in a course
canvas assignments list --course-id 12345

# Get assignment details
canvas assignments get --course-id 12345 --assignment-id 67890

# List submissions for grading
canvas submissions list --course-id 12345 --assignment-id 67890
Output Formats for Pipeline Integration
One of Canvas CLI’s most powerful features is its flexible output. This enables seamless integration with other tools.
JSON for APIs and Scripts
# Perfect for jq processing
canvas courses list -o json | jq '.[].name'

# Get specific fields
canvas users me -o json | jq '{id, name, email}'
CSV for Spreadsheets
# Export enrollments to CSV
canvas enrollments list --course-id 12345 -o csv > enrollments.csv

# Open directly in Excel/Google Sheets
canvas grades history --course-id 12345 -o csv
YAML for Configuration
# Export course structure
canvas courses get 12345 -o yaml > course-backup.yaml
Table for Human Reading
# Default format with colors and alignment
canvas courses list -o table
Advanced Canvas CLI Automation Workflows
Now let’s explore advanced techniques that can save you hours of manual work. All scripts include proper error handling for production use.
Workflow 1: Bulk Enrollment Management
Scenario: Enroll 500 students from a CSV file into a course.
#!/bin/bash
# bulk-enroll.sh - Bulk enroll users from CSV
set -euo pipefail

COURSE_ID="${1:?Usage: $0 COURSE_ID CSV_FILE}"
CSV_FILE="${2:?Usage: $0 COURSE_ID CSV_FILE}"

# Validate prerequisites
command -v jq >/dev/null 2>&1 || { echo "Error: jq is required" >&2; exit 1; }
[[ -f "$CSV_FILE" ]] || { echo "Error: File not found: $CSV_FILE" >&2; exit 1; }

# CSV format: email,role
# john@uni.edu,student
# jane@uni.edu,ta

success=0
failed=0

while IFS=',' read -r email role; do
  # Skip header
  [[ "$email" == "email" ]] && continue
  [[ -z "$email" ]] && continue

  # Find user by email
  user_id=$(canvas users list --search "$email" -o json 2>/dev/null | jq -r '.[0].id // empty')

  if [[ -n "$user_id" ]]; then
    if canvas enrollments create \
      --course-id "$COURSE_ID" \
      --user-id "$user_id" \
      --type "${role}Enrollment" \
      --state active >/dev/null 2>&1; then
      echo "✓ Enrolled $email as $role"
      ((success++))
    else
      echo "✗ Failed to enroll $email" >&2
      ((failed++))
    fi
  else
    echo "✗ User not found: $email" >&2
    ((failed++))
  fi
done < "$CSV_FILE"

echo ""
echo "Summary: $success enrolled, $failed failed"
[[ $failed -eq 0 ]] || exit 1
Workflow 2: Automated Grade Export
Scenario: Export grades from multiple courses into a consolidated report.
#!/bin/bash
# export-grades.sh - Export grades from all active courses
set -euo pipefail

OUTPUT_DIR="${1:-./grade-exports}"
mkdir -p "$OUTPUT_DIR"

# Validate prerequisites
command -v jq >/dev/null 2>&1 || { echo "Error: jq is required" >&2; exit 1; }

echo "Fetching active courses..."
courses=$(canvas courses list -o json | jq -r '.[] | select(.workflow_state=="available") | "\(.id)|\(.name)"')

if [[ -z "$courses" ]]; then
  echo "No active courses found"
  exit 0
fi

exported=0
while IFS='|' read -r course_id course_name; do
  safe_name=$(echo "$course_name" | tr ' /' '_')
  output_file="$OUTPUT_DIR/${safe_name}_grades.csv"

  echo "Exporting: $course_name..."
  if canvas grades history --course-id "$course_id" -o csv > "$output_file" 2>/dev/null; then
    ((exported++))
  else
    echo "  Warning: Could not export grades for $course_name" >&2
  fi
done <<< "$courses"

echo ""
echo "Exported $exported course(s) to $OUTPUT_DIR"
Workflow 3: Course Template Deployment
Scenario: Create multiple course sections from a template.
#!/bin/bash
# deploy-sections.sh - Create course sections from template
set -euo pipefail

TEMPLATE_COURSE="${1:?Usage: $0 TEMPLATE_COURSE_ID TERM_ID}"
TERM_ID="${2:?Usage: $0 TEMPLATE_COURSE_ID TERM_ID}"
ACCOUNT_ID="${3:-1}"

SECTIONS=("Section A" "Section B" "Section C" "Section D")

command -v jq >/dev/null 2>&1 || { echo "Error: jq is required" >&2; exit 1; }

created=0
for section in "${SECTIONS[@]}"; do
  echo "Creating: PHYS 101 - $section"

  # Create new course
  new_course=$(canvas courses create \
    --account-id "$ACCOUNT_ID" \
    --name "PHYS 101 - $section" \
    --code "PHYS101-${section// /}" \
    --term "$TERM_ID" \
    -o json 2>/dev/null)

  new_id=$(echo "$new_course" | jq -r '.id // empty')

  if [[ -z "$new_id" ]]; then
    echo "  ✗ Failed to create course" >&2
    continue
  fi

  # Copy content from template
  if canvas content-migrations create \
    --course-id "$new_id" \
    --source-course-id "$TEMPLATE_COURSE" \
    --type course_copy_importer >/dev/null 2>&1; then
    echo "  ✓ Created course $new_id with content migration"
    ((created++))
  else
    echo "  ✗ Failed to start content migration for course $new_id" >&2
  fi
done

echo ""
echo "Created $created of ${#SECTIONS[@]} sections"
Workflow 4: Batch Grading with Comments
Scenario: Grade all submissions for an assignment from a grading file.
#!/bin/bash
# batch-grade.sh - Grade submissions from CSV
set -euo pipefail

COURSE_ID="${1:?Usage: $0 COURSE_ID ASSIGNMENT_ID GRADES_CSV}"
ASSIGNMENT_ID="${2:?Usage: $0 COURSE_ID ASSIGNMENT_ID GRADES_CSV}"
GRADES_FILE="${3:?Usage: $0 COURSE_ID ASSIGNMENT_ID GRADES_CSV}"

[[ -f "$GRADES_FILE" ]] || { echo "Error: File not found: $GRADES_FILE" >&2; exit 1; }

# CSV format: student_id,grade,comment
# 111,95,Excellent work!
# 222,78,Good effort, review section 3.

graded=0
failed=0

while IFS=',' read -r student_id grade comment; do
  [[ "$student_id" == "student_id" ]] && continue
  [[ -z "$student_id" ]] && continue

  if canvas submissions grade \
    --course-id "$COURSE_ID" \
    --assignment-id "$ASSIGNMENT_ID" \
    --user-id "$student_id" \
    --score "$grade" \
    --comment "$comment" >/dev/null 2>&1; then
    echo "✓ Graded student $student_id: $grade"
    ((graded++))
  else
    echo "✗ Failed to grade student $student_id" >&2
    ((failed++))
  fi
done < "$GRADES_FILE"

echo ""
echo "Summary: $graded graded, $failed failed"
[[ $failed -eq 0 ]] || exit 1
Workflow 5: Cross-Instance Course Migration
Scenario: Export a course from staging and import to production using Common Cartridge format.
#!/bin/bash
# migrate-course.sh - Migrate course between Canvas instances
set -euo pipefail

STAGING_COURSE="${1:?Usage: $0 STAGING_COURSE_ID PROD_COURSE_ID}"
PROD_COURSE="${2:?Usage: $0 STAGING_COURSE_ID PROD_COURSE_ID}"
EXPORT_DIR="${3:-./course-exports}"

mkdir -p "$EXPORT_DIR"
command -v jq >/dev/null 2>&1 || { echo "Error: jq is required" >&2; exit 1; }

echo "Step 1: Creating content export from staging..."
export_result=$(canvas content-exports create \
  --course-id "$STAGING_COURSE" \
  --instance staging \
  --type common_cartridge \
  -o json 2>/dev/null)

export_id=$(echo "$export_result" | jq -r '.id // empty')
if [[ -z "$export_id" ]]; then
  echo "Error: Failed to create export" >&2
  exit 1
fi

echo "  Export ID: $export_id"
echo "  Waiting for export to complete..."

# Poll for export completion
max_attempts=60
attempt=0
while [[ $attempt -lt $max_attempts ]]; do
  status=$(canvas content-exports get \
    --course-id "$STAGING_COURSE" \
    --export-id "$export_id" \
    --instance staging \
    -o json 2>/dev/null | jq -r '.workflow_state // "unknown"')

  if [[ "$status" == "exported" ]]; then
    echo "  Export complete!"
    break
  elif [[ "$status" == "failed" ]]; then
    echo "Error: Export failed" >&2
    exit 1
  fi

  ((attempt++))
  sleep 5
done

if [[ $attempt -ge $max_attempts ]]; then
  echo "Error: Export timed out" >&2
  exit 1
fi

echo ""
echo "Step 2: Downloading export file..."
download_url=$(canvas content-exports get \
  --course-id "$STAGING_COURSE" \
  --export-id "$export_id" \
  --instance staging \
  -o json 2>/dev/null | jq -r '.attachment.url // empty')

export_file="$EXPORT_DIR/course-${STAGING_COURSE}-export.imscc"
curl -sL "$download_url" -o "$export_file"
echo "  Downloaded to: $export_file"

echo ""
echo "Step 3: Importing to production..."
canvas content-migrations create \
  --course-id "$PROD_COURSE" \
  --instance production \
  --type common_cartridge_importer \
  --file "$export_file"

echo ""
echo "Migration started! Check status with:"
echo "  canvas content-migrations list --course-id $PROD_COURSE --instance production"
Workflow 6: AI-Assisted Course Administration with Claude
Scenario: Use Claude Code CLI to intelligently manage Canvas tasks through natural language.
With claude -p (prompt mode), you can leverage AI to analyze Canvas data. Pipe CLI output directly to Claude for instant insights:
# Pipe course list to Claude for enrollment analysis
canvas courses list -o json | claude -p "Analyze these courses and identify
any with fewer than 10 enrollments. Show a summary table with recommendations."

# Analyze grade distribution from piped data
canvas grades history --course-id 12345 -o json | claude -p "Calculate the
average score, grade distribution, and identify students who may need support."

# Audit assignments with AI analysis
canvas assignments list --course-id 12345 -o json | claude -p "Identify
assignments that are past due but have no submissions. Format as a markdown
checklist I can share with the instructor."

# Let Claude run commands autonomously for complex tasks
claude -p "I have a CSV file at students.csv with columns email,role.
Use canvas CLI to enroll these students in course 12345.
Skip any that are already enrolled and report the results."
Example: Automated Weekly Report Generation
#!/bin/bash
# weekly-report.sh - AI-generated Canvas report
set -euo pipefail

COURSE_ID="${1:?Usage: $0 COURSE_ID}"
REPORT_FILE="canvas-report-$(date +%Y%m%d).md"

# Use Claude to generate an intelligent report
claude -p "You have access to canvas CLI. For course $COURSE_ID, please:
1. Get the course details
2. List recent submissions from the past 7 days
3. Get current enrollment counts by role
4. Identify any assignments due in the next 7 days

Generate a well-formatted markdown report with:
- Course overview
- Submission activity summary
- Enrollment breakdown
- Upcoming deadlines

Save analysis to a report, be concise but thorough." > "$REPORT_FILE"

echo "Report generated: $REPORT_FILE"
Why CLI + AI Works:
| Traditional API Access | Canvas CLI + AI Agent |
|---|---|
| Tokens exposed to AI context | Tokens in secure keyring |
| AI could leak credentials | AI only knows commands |
| Unlimited API access | Scoped by token permissions |
| No audit trail | Standard CLI logging |
| Complex error handling | CLI handles retries/pagination |
Managing Multiple Canvas Instances
Canvas CLI excels at managing multiple Canvas environments:
# Add instances
canvas config add production \
  --url https://prod.instructure.com \
  --client-id PROD_CLIENT_ID

canvas config add staging \
  --url https://staging.instructure.com \
  --client-id STAGING_CLIENT_ID

# Set default instance
canvas config use production

# Override per command
canvas courses list --instance staging

# Check current configuration
canvas config list
Interactive REPL Shell for Canvas
For exploration and ad-hoc queries, the REPL shell is invaluable:
# Start interactive shell
canvas shell

# Inside the shell:
canvas> courses list
canvas> set course_id 12345
canvas> assignments list --course-id $course_id
canvas> history
canvas> help submissions
canvas> exit
REPL Features:
- Command history (1000 items) with arrow key navigation
- Session variables for storing IDs across commands
- Ctrl+R for reverse history search
- Tab completion for commands
Real-Time Canvas Event Processing
Canvas CLI includes a webhook listener for real-time automation:
# Start webhook listener
canvas webhook listen \
  --addr :8080 \
  --secret YOUR_WEBHOOK_SECRET \
  --events submission_created,grade_change
Use cases:
- Trigger notifications when assignments are submitted
- Auto-sync grades to external gradebook systems
- Monitor enrollment changes in real-time
- Integrate with Slack/Teams for course updates
Canvas CLI Performance Optimization Tips
1. Use Result Limiting Wisely
# Fetch only what you need
canvas courses list --limit 10

# For large exports, process in batches
canvas enrollments list --course-id 12345 --limit 100 -o csv
2. Leverage JSON Filtering with jq
# Let jq do the heavy lifting
canvas courses list -o json | jq '[.[] | {id, name}]'

# Filter server-side when possible
canvas assignments list --course-id 12345 --bucket upcoming
3. Parallel Processing in Shell Scripts
# Process multiple courses in parallel
courses=$(canvas courses list -o json | jq -r '.[].id')

echo "$courses" | xargs -P 4 -I {} sh -c '
  canvas enrollments list --course-id {} -o csv > enrollments_{}.csv
'
4. Understanding Rate Limit Adaptation
Canvas CLI automatically adapts to API rate limits:
Quota > 50%  → 5 requests/second
Quota 20-50% → 2 requests/second
Quota < 20%  → 1 request/second
For heavy automation, consider scheduling during off-peak hours.
Troubleshooting Canvas CLI
Common Issues
Authentication Errors:
# Check auth status with details
canvas auth status -v

# Re-authenticate
canvas auth logout
canvas auth login https://your-canvas.instructure.com \
  --client-id YOUR_CLIENT_ID \
  --client-secret YOUR_CLIENT_SECRET

# Verify keyring access
canvas doctor
Rate Limiting:
# Check current rate limit status
canvas auth status -v

# Add delays in scripts
sleep 1  # Between batches
Debug Mode:
# Enable verbose logging
canvas courses list -v

# Check configuration
canvas config show

# Run full diagnostics
canvas doctor
Resources and Related Tools
- GitHub Repository: github.com/jjuanrivvera/canvas-cli
- Documentation: jjuanrivvera.github.io/canvas-cli
- Issues & Features: GitHub Issues
Canvas Automation Ecosystem
Canvas CLI works great alongside:
- Canvas LMS Kit - PHP SDK for building Canvas integrations and web applications
- Canvas MCP Server - Model Context Protocol server for AI assistants like Claude Desktop. While Canvas CLI is perfect for terminal-based AI agents (like Claude Code), the MCP server enables conversational AI integration in chat interfaces.
Frequently Asked Questions
What is Canvas CLI?
Canvas CLI is a command-line interface tool for interacting with Canvas LMS. It provides 280+ commands covering all Canvas API endpoints, with features like OAuth 2.0 authentication, multiple output formats, and batch processing capabilities.
Is Canvas CLI free and open source?
Yes, Canvas CLI is completely free and open source under the MIT license. You can view the source code, contribute, and use it for any purpose at github.com/jjuanrivvera/canvas-cli.
How do I install Canvas CLI on macOS?
The easiest way is using Homebrew: brew tap jjuanrivvera/canvas-cli && brew install canvas-cli. You can also download pre-built binaries from GitHub Releases or install via go install if you have Go installed.
Can I use Canvas CLI with AI assistants?
Yes! Canvas CLI is designed to work with AI agents like Claude Code. The AI can execute Canvas commands without accessing your API tokens directly - credentials are stored securely in your system keyring. Use claude -p "your prompt" to leverage AI for complex Canvas workflows.
Does Canvas CLI work with multiple Canvas instances?
Yes, Canvas CLI supports multi-instance management. You can configure multiple Canvas instances (production, staging, development) and switch between them using canvas config add and canvas config use, or override per-command with the --instance flag.
Conclusion
Canvas CLI transforms how you interact with Canvas LMS. Whether you’re managing a single course or automating operations across multiple institutions, the CLI provides the power and flexibility you need.
Combined with AI agents like Claude Code, you can automate complex workflows through natural language while keeping your credentials secure. The CLI handles authentication, rate limiting, pagination, and error handling - you focus on what you want to accomplish.
Start with simple commands, gradually build automation scripts, and before you know it, tasks that took hours will complete in seconds.
Happy automating!